Square and spiral knot
In this tutorial we will deal with 2 very basic knots, that is, square knot and spiral knot.
Both knots will be useful while creating both small macrame forms (e.g. earrings or bracelets) and larger ones.
To demonstrate how to tie these knots I will use strings attached to a barbecue stick. This method for attaching the string is among basics in macrame. In the previous tutorial.
To increase the readability of the photos I used strings in two different colours.
Let's start with the common part of both knots!
 |
| rys. 1 |
1. Attach two strings to the base (e.g. a barbecue stick).
 |
| rys. 2 |
2. For ease of reading let's name the strings.
The string with which we tie the knots is the working string. In our case we have two such strings: the leftmost and the rightmost one.
The two strings in the middle are named leading strings. These are the strings on which we will tie the knots.
 |
| rys. 3 |
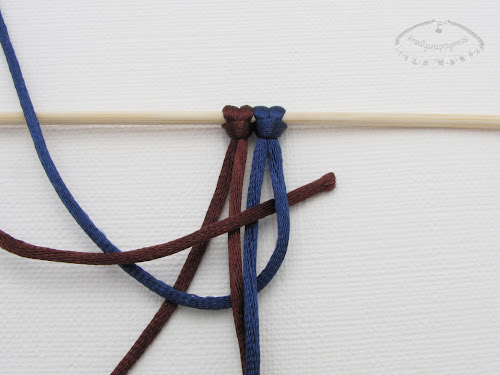
3. and 4. Let's start knotting!
Take the working string on the right side of the macrame ("right" string) and put it under the leading strings and over the working string on the left side of the macrame ("left" string).
 |
| rys. 4 |
 |
| rys. 5 |
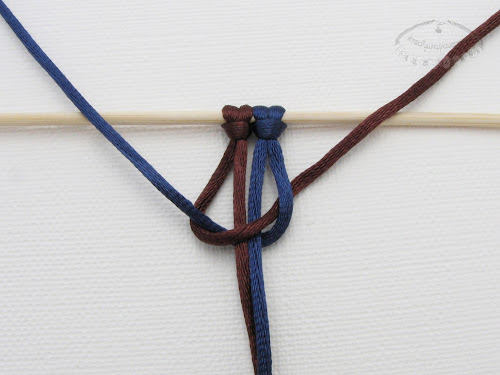
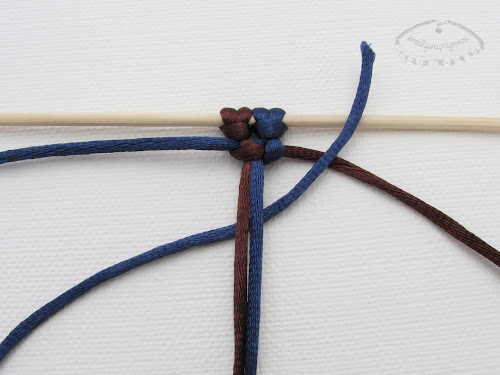
5. and 6. Then let's take the "left" string and put it over the leading strings and under the "right" string. This leads the "left" string into the loop formed by the "right" string.
 |
| rys. 6 |
 |
| rys. 7 |
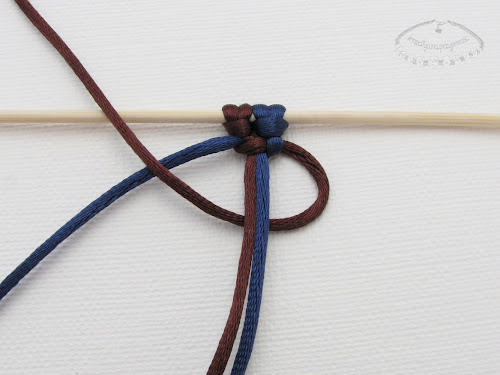
7. Tighten the knot.
In this way we get a half of the knot. Depending on how we will tie it further it can be either a square knot or a spiral knot.
The square knot
As for the square knot I will repeat myself a bit. I have already written about it at the beginning of my blogging. However, now I have some comments about it which are worth describing.
To make a square knot you need, after finishing steps 1-7, do the following:
 |
| rys.8 |
 |
| rys. 9 |
8. and 9. Now we start with the "left" string, that is the string on the opposite site as before.
The "left" string is put under the leading strings and over the "right" string.
You can notice that when making the square knot we always start with the same string - in this case the blue string.
What changes is the position of the string. After making a half of the knot it is once on the right and once on the left side of the leading strings.
When we are making a bracelet with square knots, such as this one, we can mark somehow the working string which we begin with, e.g. tie a knot on it. Then we will be sure that we won't make a mistake and the knots will be beautiful :)
 |
| rys. 10 |
10. and 11. Take the "right" string and put it over the leading strings and under the "left" string. This leads the "right" string into the loop formed by the "left" string.
 |
| rys. 11 |
 |
| rys. 12 |
12. Tighten the knot.
And now the second half of the square knot is finished. So we have the full one square knot.
13. and 14. And this is how a bar of double square knots looks like. The front is on picture 13 and back is on picture 14.
You can notice that the blue string (front, picture 13) forms vertical arches and the brown string forms horizontal lines. On the back side (picture 14) it looks the other way round. It's worth to know that if a half of a knot will be started with the "right" working string, the vertical arch wil be on the right side of the bar of square knots. When we start with the "left" string, the arch is on the left side. This knowledge will help us recognize which string we should start with when we are lost. For instance: for the work on the photos below we should start with the "right" string, because the vertical arch should be on the right side of the bar.
 |
| rys. 14 |
 |
| rys 13. |
15. and 16. We can tighten or loosen the square knot a bit. That is, it is possible to move it on the leading strings. On pictures 15 and 16 I present how such a tightened knot looks like at the front and back side.
 |
| rys. 16 |
 |
| rys. 15 |
Here you will find the examples of bracelets made with square knot:
Here you will find a tutorial which shows how to make a shamballa bracelet using the flat knot :)
The spiral knot
Let's move on to the spiral knot now.
To make the spiral knot you need, after finishing steps 1-7, to repeat steps 3-7, that is do as follows:
 |
| rys. 17 |
17. and 18. Take the "right" string and put it under the leading strings and over the "left" string.
 |
| rys. 18 |
 |
| rys. 19 |
 |
| rys. 20 |
 |
| rys. 21 |
21. Tighten the knot.
We made the second half of the spiral knot. So we have the full one spiral knot.
 |
| rys. 22 |
22. And this is how the bar of spiral knots looks like.
Please remember that while making the spiral knot we always start the work with the string on the same side of the leading strings. In this case we always start with the "right" string.
When making many such knots the work will naturally twist. This, however, should not make us start the knots from the different side. Always start with the "right" string, as in this example.

With the presented knots you can make e.g. some jewelry.
Here is a bracelet with is made with both square the knot and the spiral knot.

Brak komentarzy:
Prześlij komentarz