wtorek, 17 września 2013

Tutorial for Thursday 2


Square and spiral knot


In this tutorial we will deal with 2 very basic knots, that is, square knot and spiral knot.

Both knots will be useful while creating both small macrame forms (e.g. earrings or bracelets) and larger ones.

To demonstrate how to tie these knots I will use strings attached to a barbecue stick. This method for attaching the string is among basics in macrame. In the previous tutorial.

To increase the readability of the photos I used strings in two different colours.


Let's start with the common part of both knots!


węzły makramowe 1
rys. 1

1. Attach two strings to the base (e.g. a barbecue stick).


węzły makramowe 2
rys. 2

2. For ease of reading let's name the strings.
The string with which we tie the knots is the working string. In our case we have two such strings: the leftmost and the rightmost one.
The two strings in the middle are named leading strings. These are the strings on which we will tie the knots.


węzły makramowe 3
rys. 3

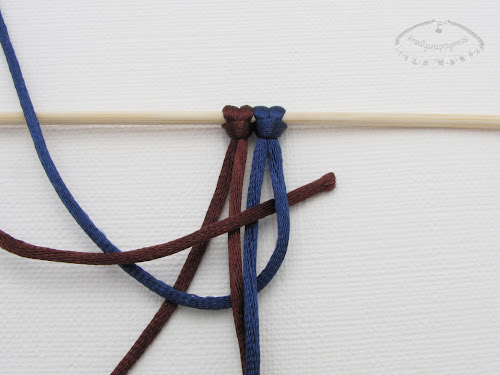
3. and 4. Let's start knotting!

Take the working string on the right side of the macrame ("right" string) and put it under the leading strings and over the working string on the left side of the macrame ("left" string).


węzły makramowe 4
rys. 4


węzły makramowe 5
rys. 5

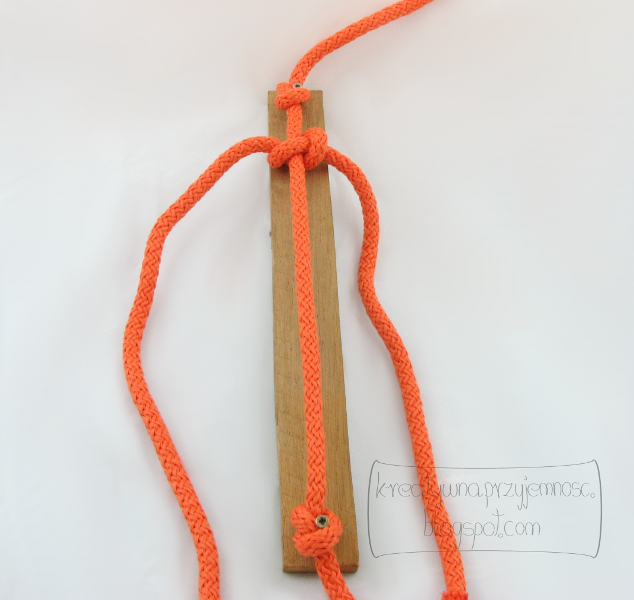
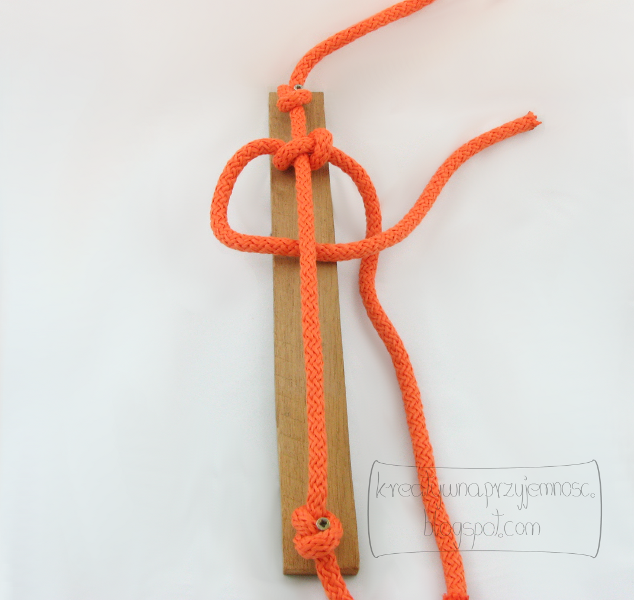
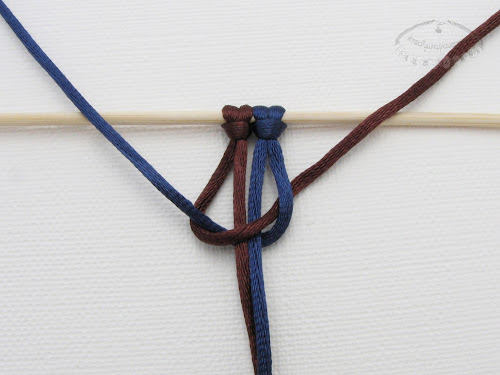
5. and 6. Then let's take the "left" string and put it over the leading strings and under the "right" string. This leads the "left" string into the loop formed by the "right" string.


węzły makramowe 6
rys. 6


węzły makramowe 7
rys. 7

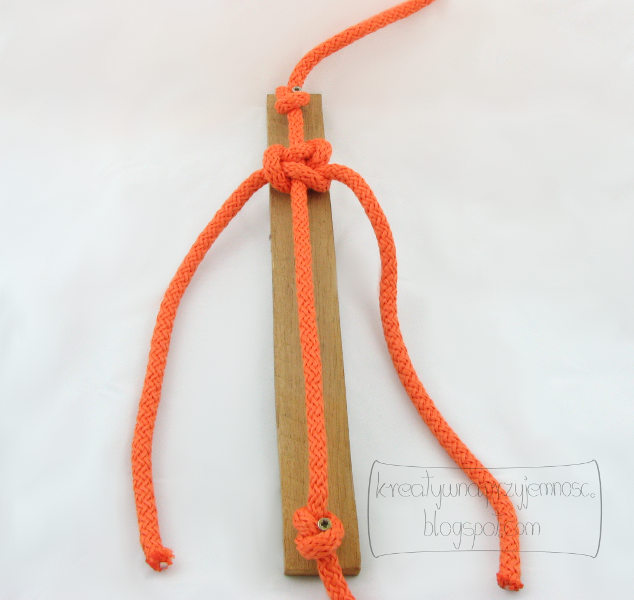
7. Tighten the knot.

In this way we get a half of the knot. Depending on how we will tie it further it can be either a square knot or a spiral knot.


The square knot


As for the square knot I will repeat myself a bit. I have already written about it at the beginning of my blogging. However, now I have some comments about it which are worth describing.

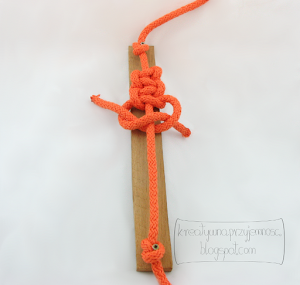
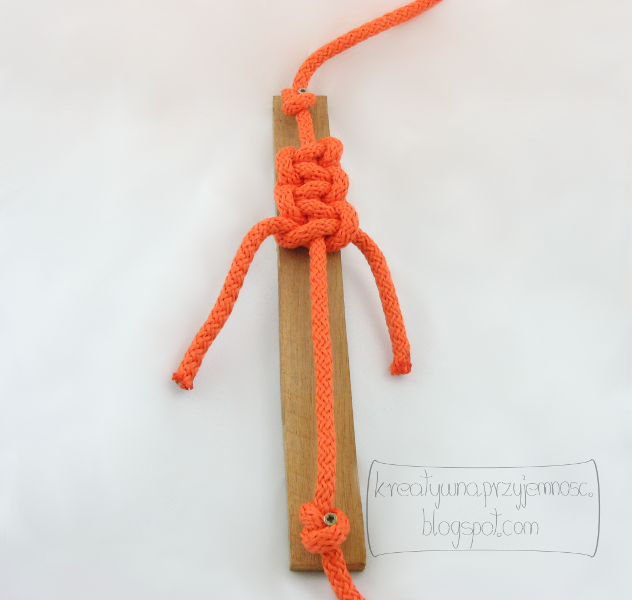
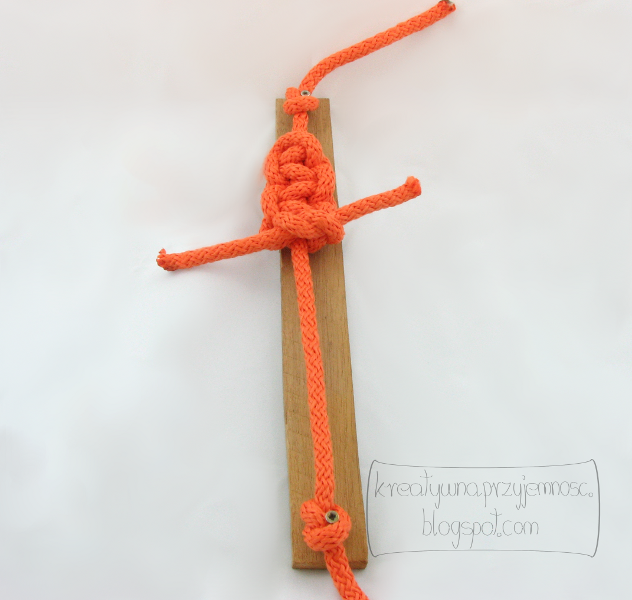
To make a square knot you need, after finishing steps 1-7, do the following:
 
węzeł makramowy płaski 1
rys.8
węzeł makramowy płaski 2
rys. 9

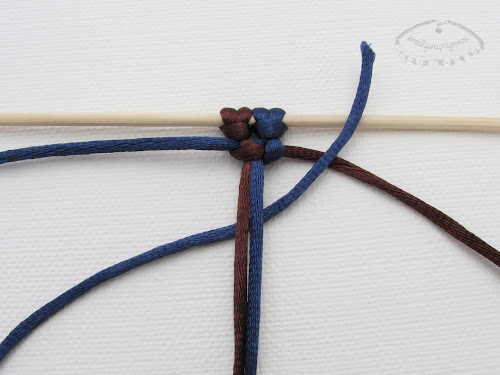
8. and 9. Now we start with the "left" string, that is the string on the opposite site as before.
The "left" string is put under the leading strings and over the "right" string.

You can notice that when making the
square knot we always start with the same string - in this case the blue string.
What changes is the position of the string. After making a half of the knot it is once on the right and once on the left side of the leading strings.

When we are making a bracelet with
square knots, such as this one, we can mark somehow the working string which we begin with, e.g. tie a knot on it. Then we will be sure that we won't make a mistake and the knots will be beautiful :)


węzeł makramowy płaski 3
rys. 10

10. and 11. Take the "right" string and put it over the leading strings and under the "left" string. This leads the "right" string into the loop formed by the "left" string.


węzeł makramowy płaski 4
rys. 11


węzeł makramowy płaski 5
rys. 12

12. Tighten the knot.

And now the second half of the square knot is finished. So we have the full one square knot.


13. and 14. And this is how a bar of double square knots looks like. The front is on picture 13 and back is on picture 14.

You can notice that the blue string (front, picture 13) forms vertical arches and the brown string forms horizontal lines. On the back side (picture 14) it looks the other way round. It's worth to know that if a half of a knot will be started with the "right" working string, the vertical arch wil be on the right side of the bar of
square knots. When we start with the "left" string, the arch is on the left side. This knowledge will help us recognize which string we should start with when we are lost. For instance: for the work on the photos below we should start with the "right" string, because the vertical arch should be on the right side of the bar.
 
węzeł makramowy płaski 7
rys. 14
węzeł makramowy płaski
rys 13.

15. and 16. We can tighten or loosen the square knot a bit. That is, it is possible to move it on the leading strings. On pictures 15 and 16 I present how such a tightened knot looks like at the front and back side.

węzeł makramowy płaski 9
rys. 16
węzeł makramowy płaski 8
rys. 15


Here you will find the examples of bracelets made with square knot:

- Róż i brąz
- Czerwień w cynamonie
- Kolorowe marmurki

Here you will find a tutorial which shows how to make a shamballa bracelet using the flat knot :)


The spiral knot


Let's move on to the spiral knot now.

To make the spiral knot you need, after finishing steps 1-7, to repeat steps 3-7, that is do as follows:


węzeł makramowy spiralny 1
rys. 17

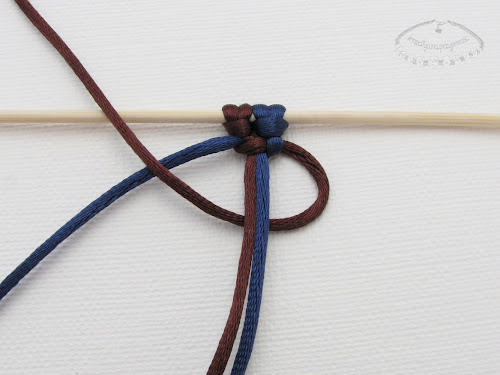
17. and 18. Take the "right" string and put it under the leading strings and over the "left" string.


węzeł makramowy spiralny 2
rys. 18


węzeł makramowy spiralny 3
rys. 19

węzeł makramowy spiralny 4
rys. 20
19. and 20. Take the "left" string and put it over the leading strings and under the "right" string. This leads the "left" string into the loop formed by the "right" string.


węzeł makramowy spiralny 5
rys. 21

 21. Tighten the knot.

We made the second half of the spiral knot. So we have the full one spiral knot.


węzeł makramowy spiralny 6
rys. 22

22. And this is how the bar of spiral knots looks like.

Please remember that while making the spiral knot we always start the work with the string on the same side of the leading strings. In this case we always start with the "right" string.

When making many such knots the work will naturally twist. This, however, should not make us start the knots from the different side. Always start with the "right" string, as in this example.


bransoletka makramowa
With the presented knots you can make e.g. some jewelry.

Here is a bracelet with is made with both square the knot and the spiral knot.


niedziela, 15 września 2013

Tutorial for Thursday 1


Welcome to first post in Tutorial for Thursday series!


In today's post I will show you how to start a macrame form.


Starting a macrame form


There are many ways to start a macrame form. When starting a new one it is good to think about which way is the most convenient for us.

This time I will show you how to start a macrame when we want to attach it to something from the beginning. It can be a metal ring, e.g. when we are making earrings or a handbag frame. We can also attach many shorter strings to one longer, e.g. upper part of my autumn collar is made in such a way.

To exercise the knot we will need a thing to which the macrame will be attached and string (for starters a thicker one will be better). I used a barbecue stick to attach my macrame.


jak rozpocząć makramę 1
rys. 1

Let's start!

1. Fold the string in half. Put the top on the stick.


jak rozpocząć makramę 2
rys. 2


2. Put the arc-shaped top under the stick.


jak rozpocząć makramę 3
rys. 3


3. Protract both ends of the string through the arc.


jak rozpocząć makramę 4
rys. 4


4. Tighten the string.

In such a way the string is well attached and we get two endings to work.

If we wish to work with larger number of strings we add them with exactly the same method.


przykład tego jak rozpocząć makramę 1
rys. 5

5. On this picture you can see how I used this knot while making earrings.

I used 4 strings which I attached to the ring. Then I knotted with vertical double half hitch pattern, which I will for sure show in futher posts :).


So as we now know how to start a macrame, in the next Tutorial for Thursday we will proceed to learning basic knots, that is the square knot and the spiral knot

Macrame, the basic knot

Macrame is an artistic form of string knotting, known since antiquity. It was used mainly for creating and decorating various sorts of textiles.


I am introducing one of many applications of macrame technique - a bracelet. More precisely, it will be a shamballa bracelet. The shamballa bracelet makes use of a basic macrame knot - the flat knot. It is made in a following way:
For your convenience ("left” string – it is on the left side of the core                                   
                                    "right” string – it is on the right side of the core)

macrame DIY 1

1. Fix the string to the frame. It will be the core of our work.We will be braiding our knots around it. The core can also be mounted in other ways, e.g. using a pad with clip, pinning it to a pillow, taping it to a table... - as you can see, there are many ideas on how to do that.
 
macrame DIY 2

 2. Take another string and move it under the core, so that the core will split the string in half of its length. This string has to be long, because it will be used for knotting. 

macrame DIY 3

3. Move the "right" string under the core and over the "left" string.

macrame DIY 4


4. Move the "left" string over the core and under the "right" string. In other words, the "left" string goes into the loop made of "right" string. 

macrame DIY 5


5. Tighten the knot. We have just made a half of the flat knot ! :) This is a little bit different from the next ones, because it is just a beginning of our macrame. 

macrame DIY 6

6. Let's move on to the next part of the knot. Now we start at the other side, that is, we do exactly what we did before, but beginning with the string on the right side of the core. The "left" string is moved under the core and over the "right" string. 

macrame DIY 7
 
7. The "right" string is moved over the core and under the "left" string. In other words, we put the "right" string inside  the loop formed by the "left" string.

macrame DIY 8

8. Tighten the knot and it is ready! :). Now we repeat the same steps, starting alternately with "right" and "left" string. 

macrame DIY 9
 
9. The "right" string goes under the core and over the "left" string. 

macrame DIY 10
 
10. The "left" string goes over the core and under the "right" string. 

macrame DIY 11

11. Tighten the knot. 

macrame DIY 12

12. The "left" string goes under the core and over the "right" string.
 
macrame DIY 13

13. The "right" string goes over the core and under the "left" string.
 
macrame DIY 14

14. Tighten the knot.
 
macrame DIY 15

15. The "right" string goes under the core and over the "left" string.  

macrame DIY 16

16. The "left" string goes over the core and under the "right" string. 
 
macrame DIY 17

17. Tighten the knot. You can continue these steps until you reach the desired length. Now let's move on to the ending. It is important that the know at the end of the macrame is as little visible as possible. In order to achieve that we will make it on the less visible side. 

macrame DIY 18

18. Rotate your work by 180 degrees around the core. 

macrame DIY 19

9. Make an ordinary, loose knot. Put a little glue between the knot and the macrame. 

macrame DIY 20

20. Tighten the knot with the glue. After the glue has dried cut the endings of the "left" and "right" string. It's ready! :)
 

DIY - lilou

Welcome to the recently announced DIY. I will show you how to make a lilou bracelet. 

When I am thinking about this type of bracelets, I am astonished by their phenomenon. It's unbelievable that people are willing to pay tens or hundreds of PLN for such a small thing. Especially that the market price of such a bracelet is unrelated to the cost of making it.

Therefore, I will present how to make your own bracelet of this type. In such a way we gain our own, unique style and much lower price! :)

We will need: 
- String - about 40cm. I used cotton waxed string, 2mm in diameter. 
- Glue (universal).
- Scissors. 
- A pendant - a motive you like. I chose glasses :). 
- A circlet - to fix the pendant. 
 
DIY Lilou - materiały

Let's start!
 
DIY Lilou - krok 1

1. Fix the circlet to the pendant. Put in on the string at the half of its length.
 
DIY Lilou - krok 2
 
2. Make an ordinary knot on the string (just as you would tie your shoes). The knot needs to have the circlet with the pendant inside. Don't draw the knot too much so that you can move it later (in case when it is not at the half of the bracelet at the end). 

DIY Lilou - krok 3

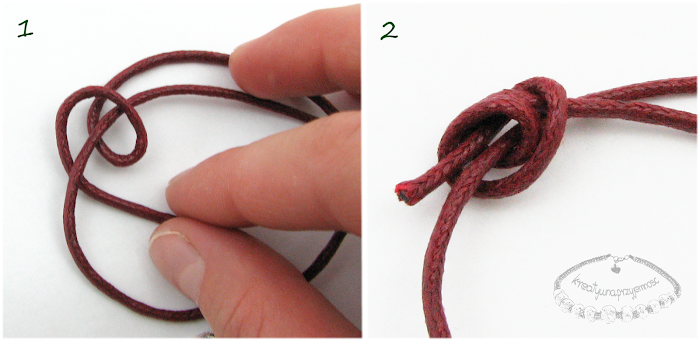
3. Arrange the string in a circle with overlapping ends. 

DIY Lilou - krok 4

 4. Take one of ends and wrap it around the circle (1). Then put the end through the whole wrap starting at the beginning (2). Below the version presented on strings having distinct colours.

DIY Lilou - krok 5-1
DIY Lilou - krok 5-2

5. Draw the string. Here's how our know looks like on one side and the other side.
 
DIY Lilou - krok 6

6. Tie an identical knot on the other end. Now we see whether our pendant is in the middle of the bracelet. If not, we can now move it. If the knot is at the good place, draw it and cut the endings near the little knots adjusting the length of the bracelet.

DIY Lilou - krok 7

 7. We can secure the ending of the string with the glue, but it is not necessary. It's ready :)

DIY Lilou - gotowa bransoletka